The place for all your outdoor living space!
Article Overview
- Before You Start: Pre-Installation Planning
- Building the Substructure: Framing, Airflow, and Joist Spacing
- Understanding Board Spacing and Expansion
- Choosing the Right Fiberon Fastener
- How to Install Fiberon Decking Boards Step-by-Step
- Finishing Touches: Fascia, Risers, and Stair Treads
- Common Mistakes That Void Your Fiberon Warranty
If you want to know how to install Fiberon decking the right way, the details matter. Fiberon backs its deck boards with some of the strongest warranties in the industry, and those warranties hinge on following the installation specs to the letter. Skip a step on airflow, gap your boards wrong, or pick the wrong fastener for the job, and you could be looking at warped boards, voided coverage, or callbacks down the road.
Fiberon makes two main families of decking – PVC and PE composite. Both install in a similar way, but the spacing requirements, fastener compatibility, and approved applications differ in ways that matter on the jobsite.
This guide walks you through the entire installation process from start to finish – substructure prep, board spacing, fastener selection, the actual install, and the finishing details. We’ll flag the PVC vs. PE differences as we go so you know exactly what applies to the boards in your hands.
Before You Start: Pre-Installation Planning
Good decks come from good planning. Before you cut a single board, walk through these prep steps to set yourself up for a clean install and full warranty coverage.
Know Your Product Line
Fiberon’s installation rules vary slightly between product families, so confirm what you’re working with before you start. Here’s a quick reference:
| Family | Product Lines |
|---|---|
| PVC | Promenade, Paramount |
| PE Composite | Concordia (Symmetry, Horizon, Astir), Sanctuary, Good Life (Escapes, Weekender), ArmorGuard, Veranda , and Novus by Fiberon |
The biggest practical differences come down to joist spacing for stairs, end-to-end expansion gaps, fastener compatibility, and whether the boards can sit in standing water. We’ll cover each of those as they come up.
Acclimation and Storage
Store your boards on a flat surface with supports every 24 inches. Keep them shaded or covered if you’ve removed the original packaging. Direct sun heats the boards unevenly and can cause distortion that shows up after the install. If you’re storing material on-site for a few days before starting, pick a spot that stays close to the temperature you’ll be installing in – that cuts down on acclimation issues once the boards go down.
Tools You’ll Need
Pull these together before you start so you’re not running back to the truck mid-install:
- Power drill
- 1/8 in. countersinking drill bit
- Miter saw
- Tape measure
- Speed square
- Adjustable square
- Pencil (white chalk only — never colored chalk, which can stain the boards)
- Level (minimum 4 ft.)
- Safety goggles
Depending on the fastener system you choose, you’ll also want the matching driver bits, a NEVER-MISS guide (included with EDGE and EDGEX clip pails), or a CAMO DRIVE tool if you’re fastening while standing.
Fiberon recommends running self-adhesive joist flashing tape – products like Grace Vycor Deck Protector or Tite Seal – across the top of every joist before you set boards. Joist tape does three things: it protects the wood framing from premature decay, creates a consistent contact surface between the joist and the deck board, and cuts down on the squeaks and creaks that happen when boards move against bare wood. It’s a small extra step that pays off over the life of the deck, and it helps preserve your warranty coverage.
Building the Substructure: Framing, Airflow, and Joist Spacing
The substructure is where most warranty issues start. A perfectly installed top surface won’t save a deck if the framing underneath traps moisture, blocks airflow, or sits at the wrong joist spacing. Get this part right and the rest of the install gets easier.
Airflow and Drainage Requirements
Fiberon decking needs room to breathe. Build your frame so at least 50% of the deck perimeter has unobstructed airflow for cross-ventilation, and leave a minimum of 1½ inches of open space between the bottom of your joists (or fascia, if it hangs lower) and the ground below.
Water has to drain away from under the deck. If your site has flat areas where water tends to pool, regrade them or add drainage before you frame. Never install Fiberon boards directly onto a solid surface like a concrete pad – that traps heat and moisture, voids the warranty, and shortens the life of the deck.
If you’re working with an under-deck waterproofing system to create dry storage or living space below, make sure the system follows its manufacturer’s guidelines and still meets the airflow requirements above. Restricted airflow is the single biggest cause of avoidable damage to composite and PVC decking.
Joist Spacing for PVC vs. PE Decking
Joist spacing depends on your product family, the orientation of the boards, and whether the project is residential or commercial. Use this chart to check your spec before you frame:
| Application | PVC (Promenade & Paramount) | PE Composite |
|---|---|---|
| Residential – perpendicular | 16 in. on center max | 16 in. on center max |
| Residential – diagonal (up to 45°) | 12 in. on center | 12 in. on center |
| Residential – stairs | 24 in. on center | 12 in. on center |
| Commercial – perpendicular | 12 in. on center | 12 in. on center |
| Commercial – diagonal (up to 45°) | 8 in. on center | 8 in. on center |
| Commercial – stairs | 20 in. on center | 8 in. on center |
A few things to flag: Fiberon allows PVC at 16 in. on center for residential perpendicular installs, but tightening to 12 in. gives the deck a more rigid feel underfoot. The biggest difference between the two families shows up on stairs – PE composite needs much tighter stringer spacing than PVC. And remember, grooved boards are not approved as stair treads regardless of which product you’re using. Square-edge only.
Special Cases: Sleeper Systems, Metal Joists, and Heavy Loads
Sleeper systems sit directly on a solid sub-structure like a roof deck or concrete slab. Minimum joist height is 1½ inches, installed level and oriented in the direction of water runoff. Because airflow is restricted, widen your side-to-side board spacing to ¼ inch (3/8 inch max) for cross-ventilation, and leave at least 1½ inches of open space at the joist ends so water and air can move through.
Metal joists require fasteners designed to drive at a 90-degree angle into 14–18 gauge steel. Fiberon’s EDGEXMETAL clips are built specifically for this, and Phantom universal fasteners can also work with a metal self-drilling screw substituted in.
Heavy loads like hot tubs need their own engineered framing per the manufacturer’s specs. Fiberon’s warranty doesn’t cover deck failures caused by heavy loads on framing that wasn’t built to support them, so don’t shortcut this step.
Blocking and Butt Joints
When you need extra blocking – at butt joints, around heavy loads, or to support mid-span – install it ladder-style. Solid blocking laid flat blocks water flow, traps organic debris, and eventually damages the boards above it. Ladder-style blocking lets water and air pass through the way they should.
At every butt joint, double up your joists or add solid blocking on each side so each board end gets its own perpendicular fastener. In regions with extreme temperature swings, add 2x blocking at butt joints to keep boards stable as they expand and contract through the seasons.
Understanding Board Spacing and Expansion
Every decking material moves with the weather, and Fiberon boards are no exception. They expand in the heat and contract in the cold, which means the gaps you leave during installation determine how the deck looks and performs five summers from now. This is the section installers most often get wrong, so it’s worth slowing down here.
Side-to-Side Spacing
Leave a minimum of 3/16 inch between the long sides of every board. This gap lets water drain through and helps small debris like leaves and pine needles fall away instead of building up between boards. The Phantom universal fastener (PE only) creates this gap automatically – with other fastener systems, you’ll set it manually. On sleeper systems where airflow is restricted, widen the gap to ¼ inch, with 3/8 inch as the absolute max.
End-to-End Spacing by Temperature
End-to-end gaps depend on the temperature at the time of installation, and the rules differ between PVC and PE composite. The logic is straightforward: install on a cold day and the boards will expand later, so you need a bigger gap. Install on a hot day and the boards are already near their expanded size, so the gap shrinks or disappears.
| Install Temperature | End-to-End Gap |
|---|---|
| 35°F and below | 1/8 in. |
| 36°–89°F | 1/16 in. |
| 90°F and above | 0 in. |
PE Composite:
| Install Temperature | End-to-End Gap |
|---|---|
| 35°F and below | 1/4 in. |
| 36°–69°F | 3/16 in. |
| 70°–89°F | 1/8 in. |
| 90°–109°F | 1/16 in. |
| 110°F and above | 0 in. |
PE composite moves more than PVC, which is why its chart is more granular and its cold-weather gaps are wider. Where a board end meets the side of another board, leave 1/8 inch below 70°F and 1/16 inch above 70°F. And whenever possible, keep boards shaded before cutting and fasten them down quickly – the closer the board temperature stays to ambient, the more predictable your gaps will be.
Spacing from Walls and Pinning Long Boards
Leave a minimum of ¼ inch between any board and a permanent structure – house siding, a column, a planter wall, anything that won’t move. This buffer gives the boards room to expand without binding and cracking.
For board lengths over 16 feet, “pin” each end with two face fasteners driven into the outermost joists. This locks the ends in place and forces thermal expansion to happen evenly toward the middle of the board, rather than pulling unevenly to one side. If you want to keep a hidden-fastener look, Pro Plug systems let you pin ends without leaving exposed screws on the surface.
Choosing the Right Fiberon Fastener
Fiberon offers several fastener systems, and picking the right one for the job is one of the most important decisions you’ll make on the install. The wrong fastener can void your warranty, leave visible screw heads where you didn’t want them, or fail to hold the board properly. Here’s how each system works and when to use it.
STARTER Clips for Perimeter Boards
STARTER clips secure the first and last boards along the perimeter of the deck. They install on the joist or rim joist with a single screw, then the grooved board slides into the clip and locks in place. Space them no more than 16 inches apart.
Fiberon recommends starting on the outside of the deck and working toward the house. This way, if you need to rip a board down to fit, the cut side ends up tight against the wall where it won’t be seen. STARTER clips work for both PVC and PE composite, but they’re only approved for boards with flat bottoms – if you’re installing PE boards with scalloped bottoms, you’ll need a different approach for the final perimeter board.
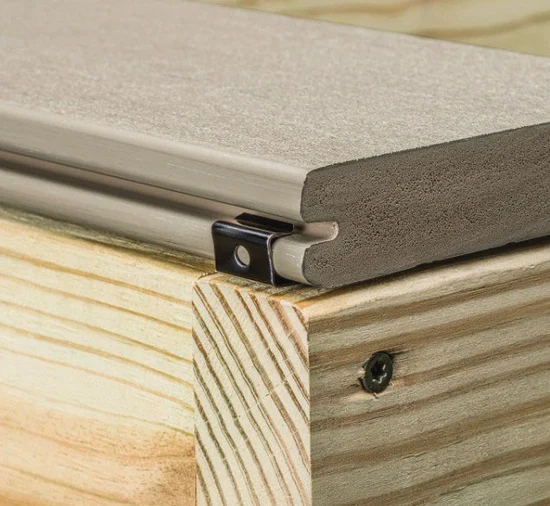
Once the first perimeter board is set, EDGE and EDGEX clips do the work of fastening every board across the middle of the deck. Both clip into the grooved edge of the board and hide completely below the surface, so you get a clean look with no visible screws.
Use EDGE clips for standard perpendicular installs. Use EDGEX clips if you’re laying boards diagonally up to a 45-degree angle – the wings on EDGEX clips handle the angle without modification. For decks framed with steel joists, EDGEXMETAL clips come with a different screw designed to drive into 14–18 gauge metal.
One important note: don’t use an impact driver with EDGE or EDGEX clips. The torque can over-drive the fastener and damage the clip. A standard drill with a clutch setting is the right tool here.
Phantom Universal Fasteners (PE Composite Only)
Phantom universal fasteners are a PE-only hidden fastener system. The screws come pre-inserted in the clip, and the clip is sized to span 1½ inches across the joist for a cleaner finished look. The big advantage: the Phantom clip automatically sets the 3/16 inch side-to-side gap between boards, so you don’t have to measure spacing manually.
Like EDGE and EDGEX, Phantom fasteners need a screw gun with a clutch – never an impact driver – to avoid over-tightening or breaking the clip.
Which Fastener Should You Use?
Here’s a quick reference for matching the fastener to the job:
| Job | Best Fastener |
|---|---|
| First and last perimeter boards | STARTER clips |
| Mid-deck grooved boards (perpendicular) | EDGE clips |
| Mid-deck grooved boards (diagonal up to 45°) | EDGEX clips |
| Steel joist framing | EDGEXMETAL clips |
| Mid-deck PE boards (alternative hidden option) | Phantom universal |
| Stair treads, replacement boards, exposed perimeter | Face screws or Pro Plug |
How to Install Fiberon Decking Boards Step-by-Step
With your substructure framed, your spacing rules locked in, and your fastener system picked, the actual install moves quickly. Here’s the order to follow.
Step 1 – Set the First Perimeter Board with STARTER Clips
Start on the outside edge of the deck, opposite the house. Secure your STARTER clips to the joists with a single screw through each clip, spacing them no more than 16 inches apart. If you’re starting against a wall instead, hold the clips at least ¼ inch off the wall to maintain the required gap from permanent structures.
Position the first grooved board into the STARTER clips. Angling the board slightly as you set it can help fully seat it into the clips, then push it down to lock it into place. Confirm the board is fully engaged before you move on.
Step 2 – Install Mid-Deck Boards with Hidden Fasteners
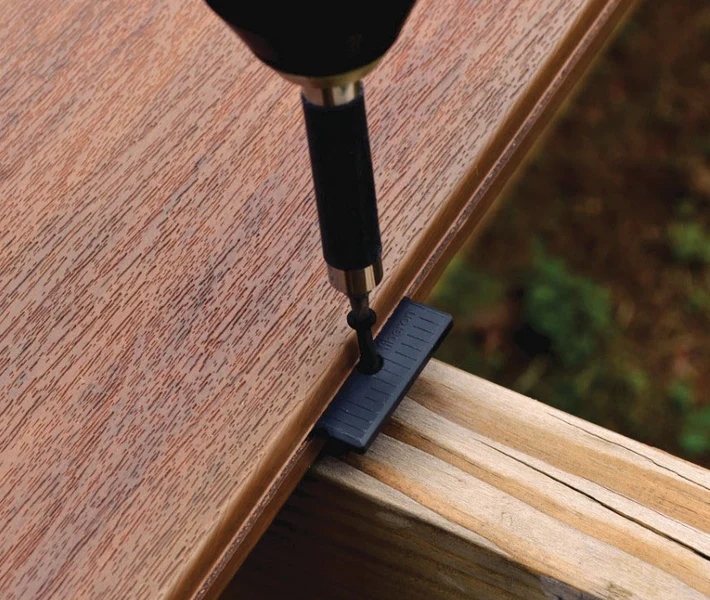
Once the first perimeter board is locked in, start running EDGE, EDGEX, or Phantom clips along the next joist line, centered on each joist. Slide or pinch the clips into the groove of the installed board, then bring the next board up against the clips and seat it fully.
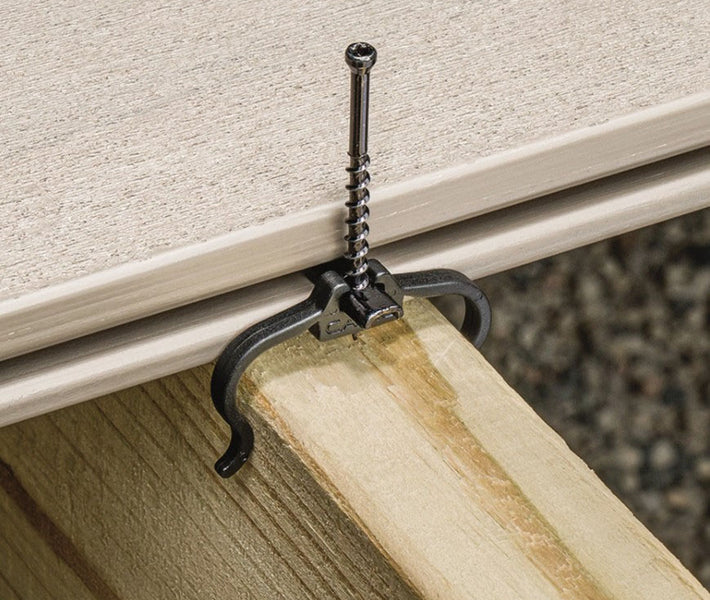
Hold the boards tightly with correct end-to-end gapping (or lock them in place with a CAMO LEVER tool), then drive the clip screws using the included NEVER-MISS guide. A CAMO DRIVE tool lets you fasten while standing if you’re covering a large deck. Repeat the process – clip, board, fasten – until you’ve covered the mid-deck area.
Step 3 – Handle Butt Joints Correctly
Wherever two boards meet end-to-end, the joint needs to land over a double joist or extra blocking, with the end gap centered between the two joists. Each butt joint needs four clips – two on each side of the joint.
If you’re using EDGE or EDGEX clips, snap the legs or wings off so the clips can sit side-by-side on the joist. Position the clips, partially fasten the screws to hold everything in place while you set the next board, then fully tighten once both boards are in position. Don’t skimp on this step – bad butt joints are one of the first things that fail visually as boards expand and contract through the seasons.
Step 4 – Set the Final Perimeter Board
The last board takes a little extra planning. Before you drop it in place, install your STARTER clips on the inside of the rim joist, securing each one with a single screw. If your rim joist is thicker than 1½ inches, set the clips on the outer edge of the joist instead.
Slide the final board into position, then drive the screws through the STARTER clips into the board at a 90-degree angle, spaced no more than 16 inches apart. If the layout makes hidden fasteners impractical here, you can face-fasten the last board with composite screws or use Pro Plug for a cleaner look.
Step 5 – Face-Fasten Where Needed
Stair treads, certain perimeter situations, and any replacement boards need face fasteners. Always drive screws at a 90-degree angle to the board surface, with two screws at every joist location. Keep them at least 1 inch from the board edge and ½ inch from the board end.
Pre-drilling is required at board ends and any time the temperature drops below 40°F – composite and PVC are both prone to splitting in the cold without a pilot hole. Drive screws so the heads sit flush with the surface, but stop there. Over-tightening crushes the surrounding material and leads to cracks down the road.
Finishing Touches: Fascia, Risers, and Stair Treads
The finishing details separate a deck that looks pro from one that looks like a weekend job.
Installing Fascia Boards
Fascia covers the rim joists and stair stringers as a non-structural finish. Run three screws down the face at no more than 12-inch intervals (or 16 inches with the Starborn Fascia System). Drive every screw at a 90-degree angle, at least 1 inch from the sides and ½ inch from the ends. Above 50°F, install with no end gap; below 50°F, leave 1/8 inch.
For PVC fascia, apply a zigzag bead of exterior urethane or acrylic construction adhesive along the back of the board to prevent thermal buckling. Install grain-side out with grain peaks pointing the same direction for a consistent look.
Installing Riser Boards
Risers finish the front of each stair stringer. Use two screws across the face at every stringer, with stringers spaced no more than 12 inches apart. Pre-drill the holes to prevent mushrooming, leave 1/16 inch between ends above 50°F (1/8 inch below 50°F), and don’t overtighten.
Stair Tread Requirements
Stair treads must be square-edge boards – grooved boards aren’t approved here for either product family. PVC treads need a treated pine 2×4 installed on edge under the center of each tread, fastened with two 12D x 3¼ inch galvanized nails. PE composite treads follow the standard 12-inch on-center stringer spacing from the joist chart earlier.
Common Mistakes That Void Your Fiberon Warranty
Fiberon’s warranty is generous, but it’s not unconditional. Most warranty claims that get denied come down to a handful of avoidable installation mistakes. Watch out for these:
- Restricted airflow under the deck. Less than 1½ inches of clearance under the joists, or unobstructed ventilation across less than 50% of the perimeter, voids coverage.
- Improper board spacing. Skipping the temperature-based end gaps, side-to-side gaps under 3/16 inch, or installing boards tight against walls without a ¼ inch buffer.
- Using grooved boards as stair treads. Only square-edge boards are approved for treads – no exceptions.
- Submersion of PE boards. PE composite isn’t approved for prolonged submersion. Docks, pool surrounds in standing water, and similar installs require PVC instead.
- PVC submerged in freeze/thaw climates. PVC handles submersion in pools and docks, but freeze/thaw cycles in submerged installs void the warranty.
- Wrong fasteners. Plain galvanized screws, traditional bugle-head screws, or impact drivers on EDGE/EDGEX clips all cause damage and voided coverage.
- Overtightening. Crushing the board around the screw head leads to cracking and isn’t covered.
- Solid blocking instead of ladder-style. Flat-laid blocking traps water and debris, damaging boards over time.
- Heavy loads on undersized framing. Hot tubs and similar loads need engineered support per the manufacturer’s specs.
Most of these come down to one rule: follow the install instructions. Cutting corners on prep is what costs people their warranty – not the actual board installation.
Installing Fiberon decking the right way comes down to respecting the details – proper airflow, correct gapping, the right fastener for the job, and consistent technique from the first board to the last. Get those right and you’ll end up with a deck that looks great, performs through every season, and stays covered under Fiberon’s warranty for decades.
Premium Decking Supply carries the full Fiberon lineup, from Promenade and Paramount PVC to Concordia, Sanctuary, Good Life, ArmorGuard, and Veranda PE composite – along with every fastener system covered in this guide. If you have questions about which boards or fasteners are right for your project, reach out to our team. We’re here to help you get the spec right before the first cut.