The place for all your outdoor living space!

What Is a Picture Frame Deck?

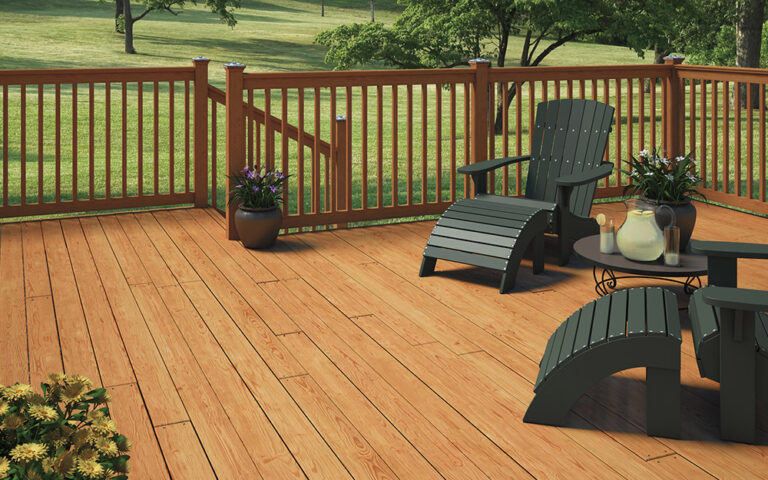
A picture frame deck features a border that runs around the outer edge of the deck surface. This technique hides the cut ends of your deck boards and gives your build a clean, polished look. The border adds aesthetic appeal and works well on both wood decks and composite deck designs.
By framing your deck, you get more than just style – you get structure. A framed edge helps reduce movement, protects the boards from fraying, and highlights the entire space with a designer finish. It also perfectly complements railings, stairs, and landscaping.
Whether you’re building a brand-new deck or upgrading an old one, a picture frame layout enhances your deck builds visually and functionally. A small detail makes a significant difference, and you can achieve it with basic tools and a little planning.
In this guide, we’ll walk you through everything you need to know to build a picture frame deck from beginning to end.
Benefits of a Picture Frame Deck
A picture frame deck does more than look good – it adds value and structure. One of the biggest benefits is the clean, finished edge it creates. Without a border, the ends of deck board cuts can look rough or uneven. Picture framing solves that problem by covering the exposed edges.
It also helps secure the perimeter of your deck. That added stability means less shifting and fewer maintenance issues over time. If you’re using a composite deck, framing helps reduce edge fraying and gives your boards extra protection.
A significant benefit is its adaptable design potential. Whether you’re working on a ground-level platform or a raised layout, a picture frame border creates a professional, symmetrical look. You can match your decking and railing or contrast the frame color for a custom touch.
This layout also supports layout creativity – from standard borders to a double picture frame deck for dramatic impact. Both choices offer the identical advantage: a polished edge that enhances and highlights your construction.
With the right planning, the picture frame deck style creates perfect outdoor spaces for relaxing, entertaining, and adding long-term value to your home. Beyond visual appeal, this method adds structure and improves overall deck performance.
Planning Your Picture Frame Deck Design

Start your picture frame deck by planning the layout. Begin with measurements. Sketch the size and shape of your space. Decide how many sides you want to frame. A single border adds a simple finish. A double picture frame deck creates a bold design edge.
Consider the direction in which the deck border will run. Most borders run parallel to the deck edge, but you can angle them or create patterns for more detail. For added contrast, use different tones or textures of composite deck boards.
Also factor in your decking and railing placement. Will your border meet staircases or wrap around posts? These decisions affect your cuts and framing needs. Begin the process by mapping out your entire layout.
Don’t forget spacing. Leave room between the field boards and border boards for expansion and airflow. This is especially important with composite decking offers that expand in heat.
Finally, choose a style that matches your home. Your deck design should blend with your exterior, not compete with it. A picture frame layout can look modern, rustic, or traditional, depending on your material and pattern choices.
Plan carefully and you’ll avoid headaches later. A strong layout leads to cleaner cuts and a better finish.
Materials and Tools You’ll Need
A successful picture frame deck build starts with the right tools and materials. At minimum, you’ll need a circular saw, drill, square, tape measure, chalk line, and reliable fasteners. For framing, have joist hangers, blocking material, and structural screws on hand.
Material selection is just as important as precision. If you’re working with a composite deck, choose boards rated for low expansion and contraction. Composite decking offers clean edges, consistent color, and reduced upkeep – ideal for a polished perimeter.
Decide whether you want your picture frame boards to blend or contrast. Matching tones create a seamless look. Contrasting colors highlight the border and define the space.
When planning for a composite deck picture framing layout, use hidden fasteners or manufacturer-approved screws to maintain board integrity and visual flow.
Framing this style requires more cuts and tighter measurements. Always account for waste and overage when ordering your decking material.
Step-by-Step: Picture Framing a Deck

Step 1 – Install Frame Deck Blocking
Framing a picture frame deck starts beneath the surface. Begin by adding perimeter blocking around the entire deck frame. This extra support is essential – it provides a solid foundation for the outer picture frame boards and prevents sagging or movement over time.
Use pressure-treated lumber or framing-rated composite blocks. Space the blocking tightly between joists at every point where a border board will rest. Secure all blocking with joist hangers and structural screws for long-term durability.
Strong blocking ensures your frame deck will stay level, and it prevents any flex beneath your border. We highly recommend not skipping or overlooking this step.
Step 2 – Cut and Install Picture Frame Boards
Next, install the outer border using mitered cuts for a clean, professional look. Use clamps or spacers to dry-fit the perimeter first, adjusting as needed before final installation.
Precision is key. Every cut must align perfectly to avoid gaps at the corners. With a picture frame composite deck, allow small expansion gaps per manufacturer specs – especially in hotter climates.
Secure the picture frame boards using hidden fasteners or color-matched screws. This helps preserve the sleek appearance and minimizes surface damage.
If you’re working on a double picture frame deck, this step will require two rows of border boards. Use a contrasting tone or grain to accent the frame. This double-layer style adds depth and dimension to the deck while reinforcing the border’s edge.
Keep checking for level as you install. Even slight inconsistencies at this stage can throw off your infill layout.
Step 3 – Add the Infill Boards
Once the frame is complete, fill in the center of your picture frame deck with the main decking boards. Run the boards perpendicular to the joists and inside the border. Space them evenly and maintain a consistent line throughout.
Many builders follow a picture frame deck pattern that adds direction and flow to the layout. Whether you’re working with wood decks or composite, align the first board carefully. Every board that follows will build off that initial line.
Use fasteners that match your material and board thickness. A tight, clean field installation ensures the frame stands out.
Step 4 – Final Checks and Fastening
With all boards in place, check for uniform spacing, level surfaces, and properly driven fasteners. Walk the full surface of your picture frame deck to spot any bounce or flex, especially near borders and seams.
Secure loose boards, tighten screws, and trim any overhangs. For composite builds, check manufacturer specs again to confirm fastening methods and edge clearance.
Once finished, the picture frame composite deck should look tight, square, and symmetrical. Small adjustments during this phase go a long way in the final appearance.
This is the stage where a good deck becomes a great one.
Design Variations for Picture Frame Decks

A picture frame deck doesn’t have to follow a standard pattern. Once you understand the basics, you can customize the layout to match your design goals.
One of the most popular upgrades is the double picture frame deck. This adds a second border around the perimeter, often in a contrasting color or texture. The result is a bold, architectural look that defines the space and adds depth.
Some builders prefer to shift the pattern itself. Diagonal infill boards paired with straight borders create a dynamic layout. Others combine curved corners, angled edges, or wide outer frames to break up long lines and add interest.
With composite deck picture framing, design flexibility increases. You can mix textures, incorporate lighting into the border, or transition into stairs with matching deck border features.
These creative choices don’t just improve the visual layout. They also help your picture frame deck feel intentional, finished, and truly custom.
Common Mistakes to Avoid
Even experienced builders can overlook small details that impact the final look of a picture frame deck. One of the most common issues is skipping perimeter blocking. Without it, your picture frame border will flex or lift over time.
Another mistake is rushing miter cuts. Gaps at the corners distract from the clean border you’re trying to achieve. Measure twice, cut once – especially with composite decking.
Improper spacing is another red flag. Forgetting to leave expansion gaps in a picture frame composite deck can cause buckling during hot weather.
Avoid shortcuts. Precision and patience make the biggest difference in the final result.
Final Thoughts on Framing Your Deck
A picture frame deck delivers more than curb appeal. It adds structure, conceals cuts, and creates a polished, professional look. Whether you’re working with wood or planning a picture frame composite deck, the result is a cleaner, longer-lasting build.